Nick Chase: A Detective Story
Tips, Walkthroughs, Cheats, & Strategy – Part 1
- Click on the brush that is on the small dresser that is on the floor and it will go into inventory.
- Click on the fish tank to get a closer view.
- Grab the brush from inventory and click it onto the bowl 9 times in order to clean the tank out well.
- Click on the tall cabinet that is in the back of the room and the doors will open.
- Grab the fish food that is on the right side and it will go into inventory.
- Grab the food from inventory and place it on the fish bowl.
- Click on the bowl again and the pop-up window will disappear.
- The phone starts ringing, pick it up.
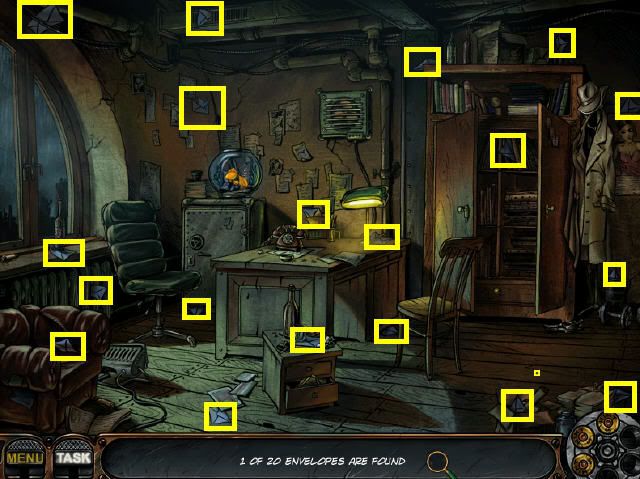
- The location of the first envelope will be shown to you, the screenshot will show you where the rest are.
- Pick up the bullets that you find around the scene and you will receive extra hints.
UNEXPECTED OBSTACLE-DOOR PUZZLE
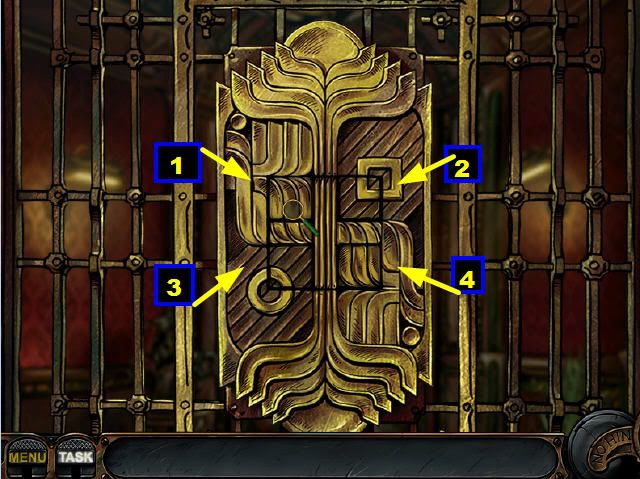
- A door puzzle will appear on the scene you have to click on the squares until all the pieces fall in place.
- There are 4 squares, from left to right, I will number them 1 through 4
- 1-When you click on this one it only changes itself.
- 2-This one changes all the squares at one time.
- 3-This square changes, squares 1, 3 and 4 only
- 4-When you click on this square, it turns number 1 and 4 only.
- follow these steps…
- Click on square number 2 a total of 3 times.
- Click on square number 3 a total of 2 times.
- Click on square number 4 a total of 2 times.
- Click on square number 1 a total of 2 times.
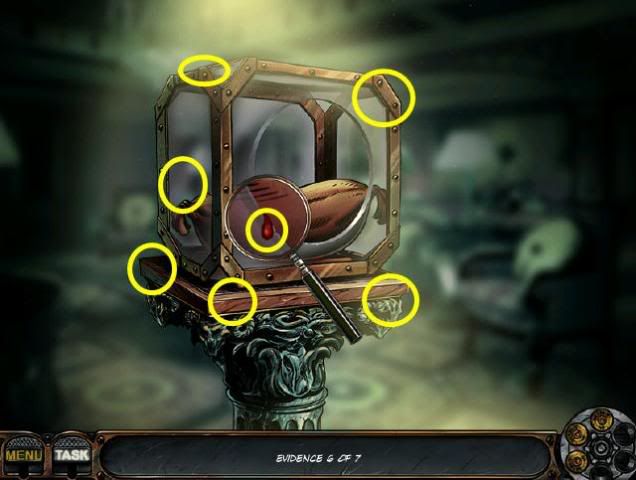
- Use the magnifying glass to look for evidences around the scene. You will need to find the following items.
- When you find an item click on it and the number of evidences will be reduced by one.
- Blood
- Hair
- Blue Thread
- Fingerprint
- Button
- Piece of red cloth.
- Brown smudge
- Click on the scene in order to make the picture current.
- Just click on the scene and the squares will change the pictures that are in the scene.
- Please look at the screenshot for the solution.
FIND PIECES OF THE ANALYZER AND ASSEMBLE THEM
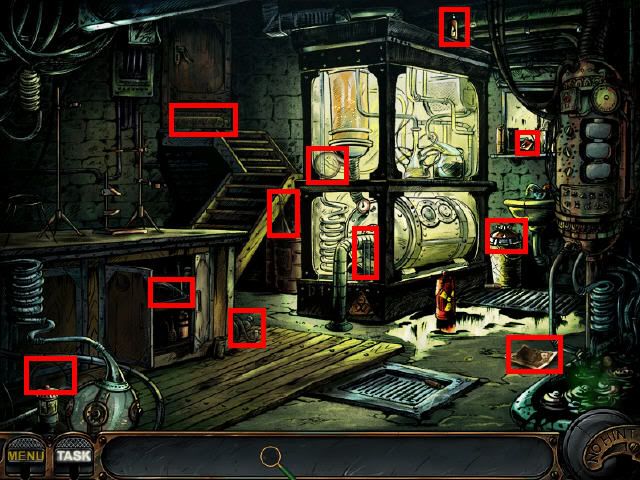

- Click on the picture that is on the lower right side of the ground.
- The picture shows you what the analyzer should look like. The picture can be viewed by clicking on it when it goes in the lower right corner of the scene.
- Please look at the screenshot for the location of all the items.
- Once you find 10 pieces start assembling them on the left side on top of the counter.
- Place all the glass retorts on first , then place the burner on the lower left side of the table.
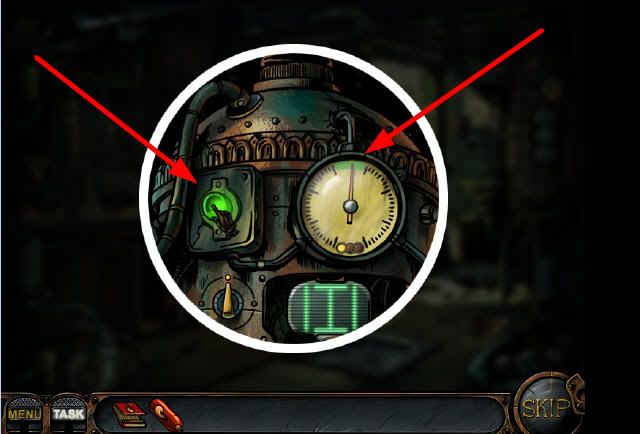
- Click on the reagent that is on the right side of the room,you will get a closer view.
- You will see a needle moving, a green button and a gauge.
- Click on the green button when the gauge reaches the green part of the gauge.The green part will move to a different part of the gauge, repeat the same step as above.
- You will need to hit the green area, three times in a row in order to move on to the next section.
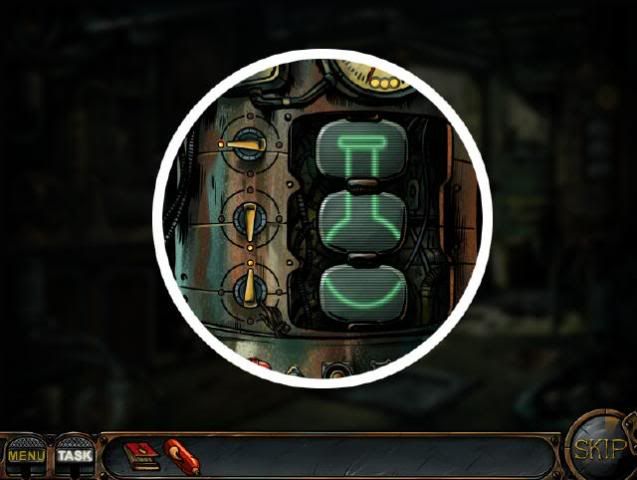
- Once you get to the next area, click on the buttons to change the images. You want the image to look like a glass retort.
- Please look at the video and the screenshot for additional help.
BUTTON SEQUENCE/ REAGENT FORMULA
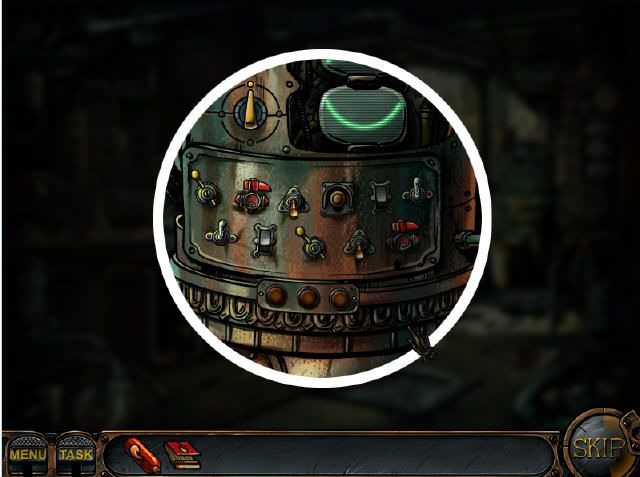
- Reproduce the 3 sequences in which the buttons are pushed.
- Look at the sequence in which the buttons are being pushed and then you duplicate it in the same manner. Once you get the first sequence right, the first button will remain yellow. Then follow the same steps until all the buttons have turned a solid yellow.
- Click on the faucet to make the water run and the reagent formula will form in the glass bottle,click on the formula.
- Place the formula on the beaker that is on the counter, left side.
- Place the fuel on the burner first and then place the matches on the burner.
- Once the reagent has been analyzed Nick Chase will say “OK,Now for the results”..click on the faucet that is at the end of the analyzer.
- Then click on the glass retort that is under the test tube once it is filled.
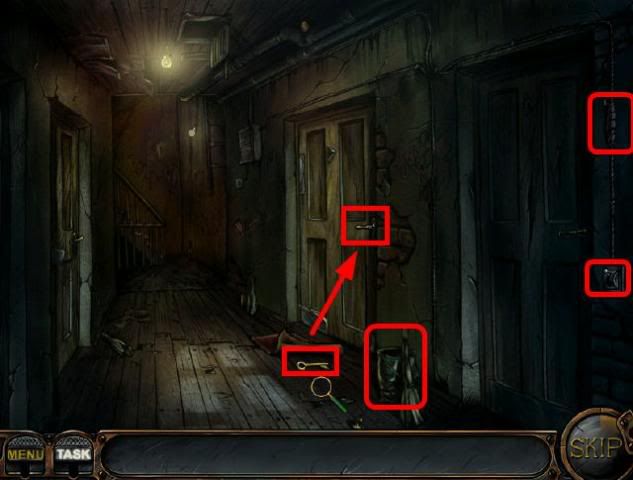
- Click on the trashcan, grab the bullet that is inside (the bullet could also be in other places)
- Grab the red tape that is inside as well.
- Place the tape on the wire that is on the right edge of the scene and then click on the light switch that is at the end of the wire and the lights will turn on.
- Click on the doormat and you will find a key underneath it, pick it up.
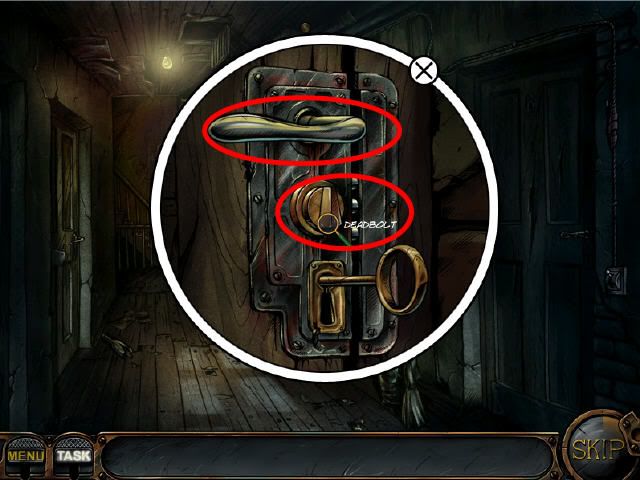
- Click on the door that is on the left side, the one closest to the steps and you will get a pop-up view of the lock.
- Place the key in the keyhole, click on the deadbolt lock,above the keyhole ONE time and then click on the handle, the first deadbolt will open.
- Click on the deadbolt lock 3 times (until the small end of the lock is facing upwards)then click on the handle again, the second deadbolt will open.
- Click on the deadbolt lock 3 times so the lock is facing to the left and the door will open.
JOE THE SCRIBBLER’S ROOM-FIND THE PIECES OF THE CHEST
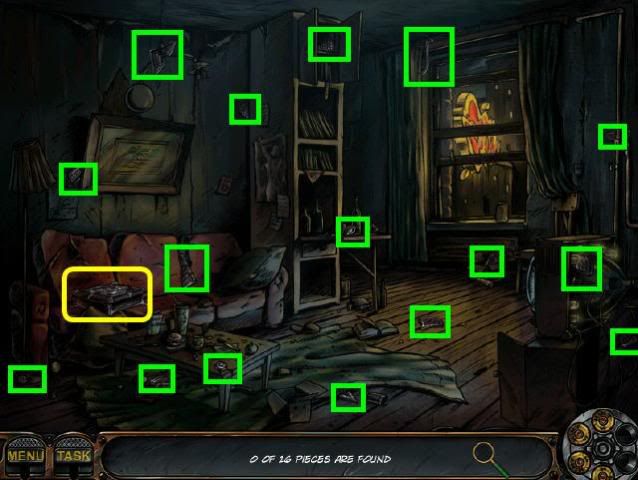
- Please look at the screenshot for the location of the pieces.
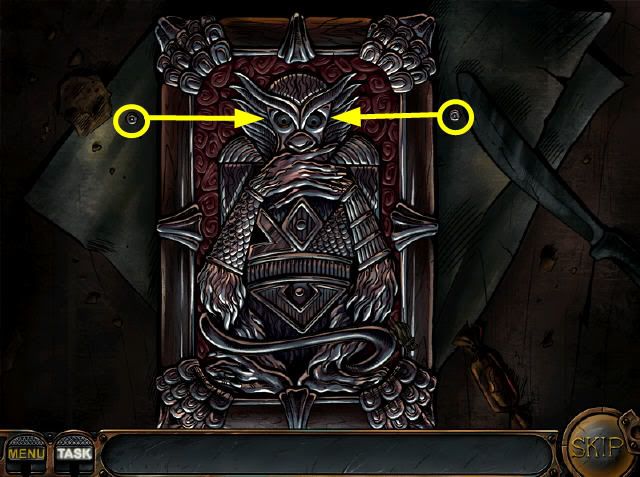
- Once all the pieces have been found, place the puzzle pieces on Joe’s chest that is on the left side of the red couch.
- Place the puzzle pieces together by clicking them in place.
- Look at the patterns at the base of the puzzle, you will see some lines, look for shapes that have the same type of shape and click them in place.
- When a piece is in the right place, you will see a message that says “OK” flash in the screen.
- The eyes will be the hardest ones to place, if they are not covering the entire eye area, the game will not accept it.
- This is a random solution, it all depends on the pieces that are handed to you during your game.
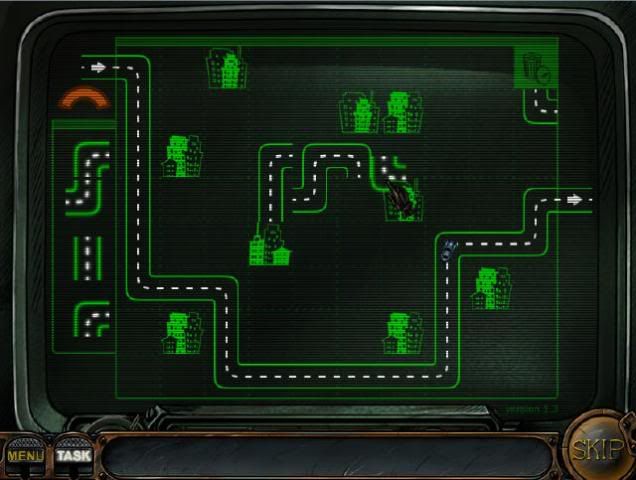
- This is like a pipe puzzle in a sense, you have to build a solid line between the first entrance on the left side of the page and the exit on the right side of the page.
- You don’t have any control over the pieces that are on your cursor. You have to either use a piece that is on your cursor or throw it away. If you decide to place a piece on the road, you cannot move it again.
- At a certain point (when the meter turns red) the car will come out of the left side of the page onto the part that you’ve already built. If the road is not completed at that point you can continue to build the road as the car is traveling.
- However, if the car reaches the end of the line and the road is not complete you will have to start over.
- Arrange all the puzzle pieces together. Please look at the screenshot for the solution.
DONNIE’S WORKSHOP-USE THE LAB TO CREATE A COPY OF THE PERMIT (VIP PASS)
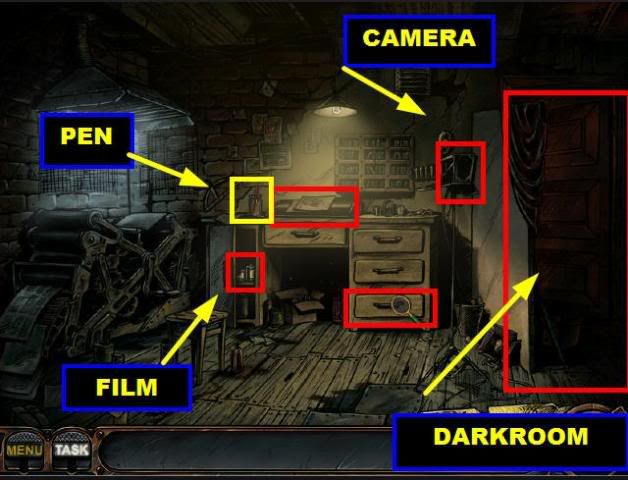

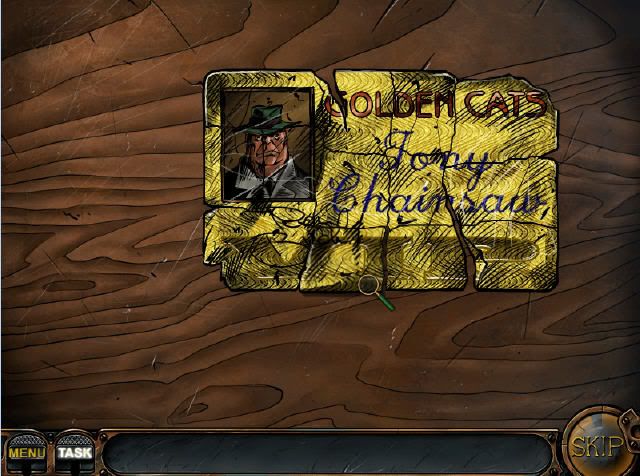
- Click on the drawer that is on the lower right side and it will open, click on the gold paper and you will see a gold VIP card appear in the top left corner of the scene.
- Grab the red pen that is on the left side of the table and it will go into inventory.
- Place the pen on the light table and you will get a closer view of Ron’s signature.
- Your goal is to trace the parts of the signature that are in red. As you finish one part another will highlight and so and so forth.
- Once you’re done tracing the signature, it will appear on the gold VIP card that is on top of the page.
- Pick up the roll of film that is on the left side of the desk, inside the slightly open drawer.
- Place the film in the camera that is on the top right side of the page.Nick tells you that the camera is ready.
- Click on the camera to take a picture. the roll of film will go back into inventory.
THREE STEPS FOR MAKING THE ROOM DARK

- 1-Click on the darkroom door that is on the left side of the page and the door will close.
- 2-Click on the fan that is on the top right side of the page because it is letting the light come into the darkroom.
- 3-You also need to click on the 3 beams of light that are coming through the cloth on the back wall.
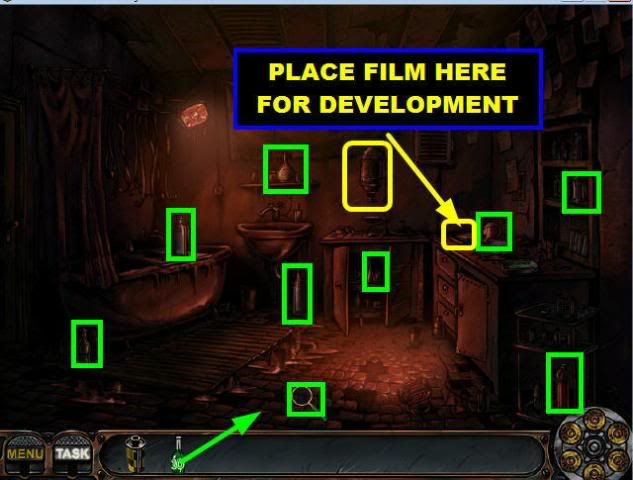
- Pick up the water bottle that is next to the tub.
- Under the sink.
- in the open cabinet that is against the back wall.
- Top right side on the shelf.
- Lower right side, on the shelf that is on the floor.
- Lower left side, next to the tub.
- On the back wall, above the sink.
- Lower right side, on top of the counter.
- Lower center, on the floor.
MIX REAGENTS IN SIMILAR AMOUNTS TO OBTAIN THE NEGATIVE
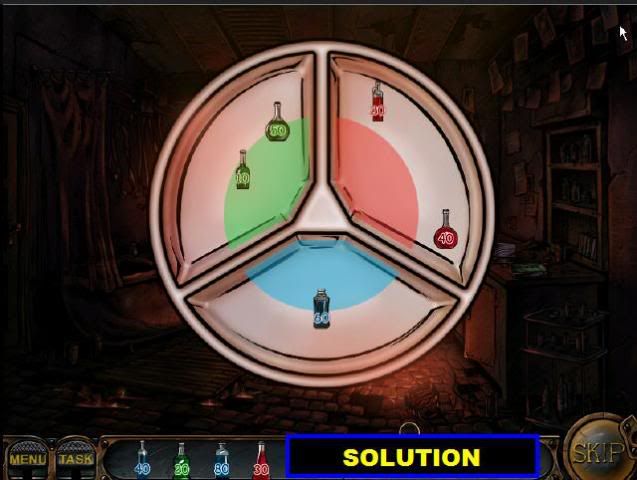
- Place the film on the small round tray that is on the lab table and you will get a closer view of the dish.
- Place the ingredients on the tray so that each color measures exactly 60.
- Top left side, add the “50” and “10” green bottles.
- Top right side, add the “40” and “20” red bottles.
- Lower side, add only the blue bottle marked “60”.
- Once everything is mixed correctly, the negative will go into inventory.
- Place the “negative” on the ”photographic enlarger” that is on the back wall, above the cabinet that is next to the sink and the developed picture will go into inventory.
- Click on the door to go back to Donnie’s worksop.
USE THE LAB TO CREATE A COPY OF THE PERMIT (VIP PASS)
- Click on the “old permit” that is on the lower right corner of the page, just above the game’s “skip” button. This is the permit that you want to copy.
- Place the picture from inventory onto the gold “VIP” card that is on top of the page and the picture will go in the top left corner.
- Click on the shelf that is above the desk, right side of the back wall and you will get a pop-up window.
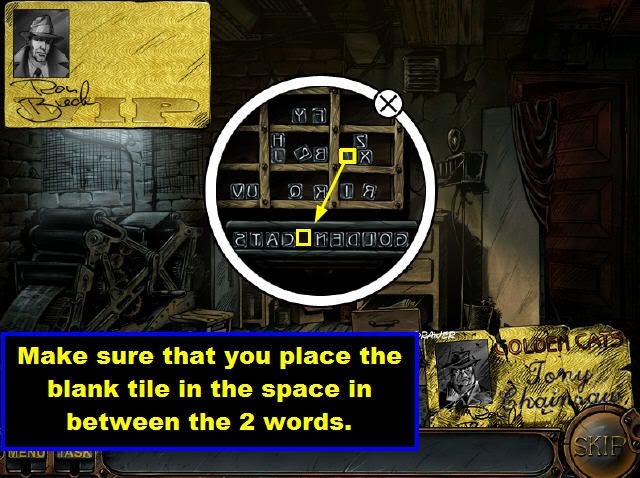
- Spell out the word “GOLDEN CATS” but it has to be placed backwards, so you have to place the tiles on the holder in the following manner…
- “STAC NEDLOG” You have to leave a space in between the two words but you have to make sure that you place a blank tile there, you cannot leave it empty.
- Make sure that the letters you choose are a mirror image of the actual letters, in other words, they have to face backwards.
- Once the last tile has been placed correctly the stamp will go into inventory automatically.
- Grab the stamp and place it on the VIP card to end the level.
- Click on the door that is on the right side of the scene to enter the darkroom.
- Once all the sources of light have disappeared you can continue with the level.


wait!!! how do u get grahms room to have a doorknob??????
this is not complete